Ultralight waterproof backpack mk. III
Introduction
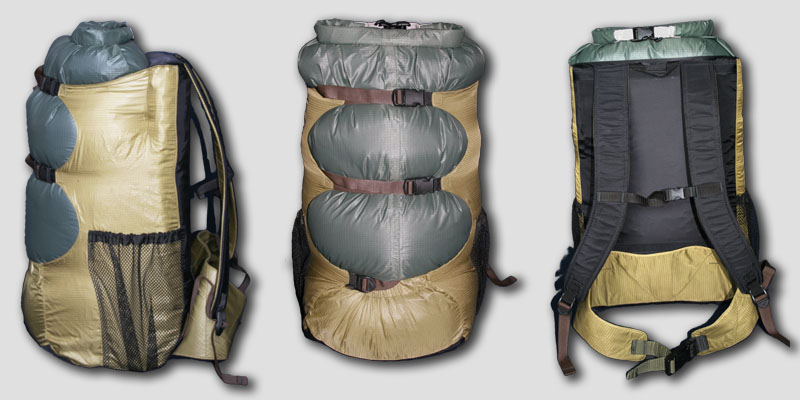
I decided to make this backpack not only because I enjoy making my ouwn gear, but also because there is no commercially available pack with the features I wanted. Highlight of the design is full waterproofnes. Since I converted from poncho to wp/b jacket for rain protection, I was looking for solution that will let me not to worry about my gear getting wet, even in the worse conditions. There are of course more advantages. One can let the waterproof bag outside shelter, hang it out of reach of bears, swim with it... The extra weight compared to similar non-waterproof pack is saved in the end because no pack cover, liner or waterproof stuffsacks are needed. Then, my pack should be as light as posible while still being comfortable. It means especially a frame of some sort and a hipbelt. Final weight of the backpack, including the drybag, is 320 grams.
This is a third version of the pack. The design was was fine-tuned in the process and now it meets all the expectations.
Design
Making classical backpack waterproof is possible, but to make it durable enough, the materials would be quite heavy. My approach is different - the pack is divided into two parts - lightweight waterproof bag, that needn't to handle almost any stress, and the partial shell, or harness, that needn't to be waterproof.
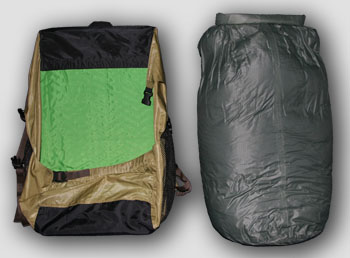
Sleeping pad, that serves as a frame, is inserted in between - protected from wear, but easily accessible. Placing the pad outside the drybag allows the pack to hold its shape better, with the back flat rather than round as in most ultralight single-compartment backpacks. The downside of tis arrangement is that it can get wet, but I didn't find this to be a big problem. It is protected enought to stay dry in a rainshower, and some protection can be added when the weather is really bad. Light trashbag can be used and will last long time, or you can wrap the pad in your tarp at no added weight.
There are two mesh pockets on the sides of the pack, intended mainly for water bottles. Space between the drybag and the shell can be used for storage as well, especially for wet things that shouldn't be put ito the drybag. Wet clothes can be hung from the compression straps to dry.
There is only one thing you should consider before making the pack. Its height is given by the width of a foam pad used as the frame, what means that the pack is rather short. The pack won't be very comfortable for tall person when heavy load is carried, the hipbelt will be too high to be useful. It is possible to modify the pattern to make the pack higher, but it won't work with ordinary sleeping pads. The simple solution is to keep your pack light.
The patterns and instructions are published under Creative Commons license for noncommercial use. See page footer for details.
Materials
The harness is made from several materials that fit best different parts, saving weight where possible. The backpanel is made from lightweight coated nylon. Silnylon could also be used, it is stronger but more slipery. The backpanel should be waterproof to protect the sleeping pad from rain and sweat.
Bottom is made of a bit heavier uncoated nylon. It shouldn't be waterproof so that water can leak through and won't be collected at the bottom of the pack.
Rest of the pack shell is made from uncoated parachute nylon, doubled at the side compression panels.It is a nice and though fabric and I got it quite cheap. Any other lightweight uncoated fabrics will do. Silnylon could be also used here and will be stronger and more abrasion resistant.
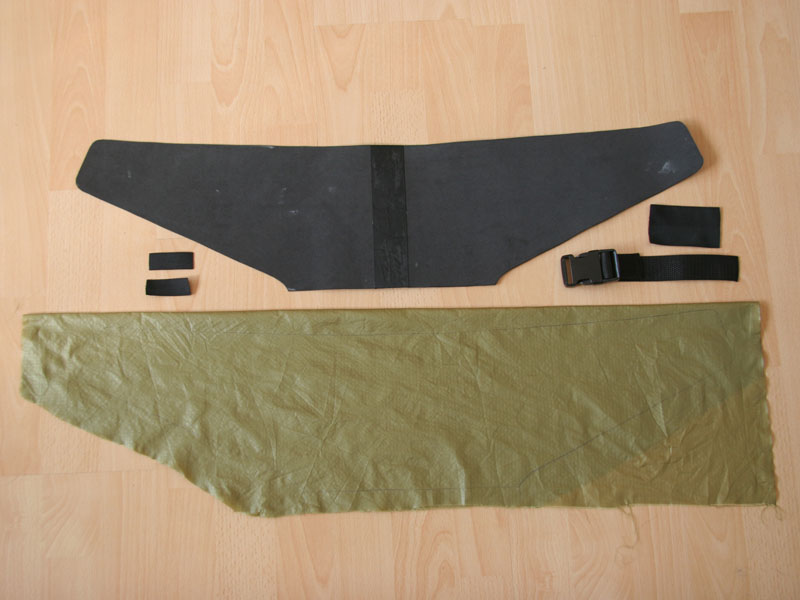
Hipbelt, if included, is made of thin foam covered in parachute nylon. I perforated the foam so that it could breathe at least a bit more than conventional hipbelts.
Shoulder straps are made of thicker foam (i.e. reincarnated sleeping pad). I made the outer layer from the same uncoated nylon as the bottom. Coated fabrics can be used here as well and will be stronger. From inside, the straps are lined with the parachute nylon again.Finding material for the drybag was quite difficult. First material I used make my own drybag started to leak after one weak of use. Then, I switched to commercially available drybagbag (lightweight PU coated, sold as a pack liner) lasted only one two-week trip before the coating started to peel off. Next version was again self made, I found better PU coated fabrics. It worked well in occasional reain, but on one trip with continuous rain and wet snow, I found that it is leaking a bit, tot in any specific place, just through the coating. More tests at home confirmed this. Now, I switched to Outdoor Research Helium drybag (Size #5), it is made with silicone coating outside and PU inside. It is fully waterproof, we'll se how long it lasts. It would be possible to make lighter bag from silnylon, but it won't be 100% waterproof, and taping the seams will be difficult.
Other materials need not to be discussed in details and are found only in the list:
- Hipbelt (Photo)
- Thin (∼3 mm) foam – 1:1 pattern, fits 73 x 19 cm rectangle
- Parachute nylon, rectangle 76 x 48 cm
- 3 cm wide webbing, to be trimmed to your size
- and a buckle that fits it
- 10 cm of elastic (∼2 cm wide)
- Shoulder straps (Photo)
- Foam, about 6 mm thick. Two pieces fits rectangle 46 x 17 cm
- Heavier fabrics for shell, a pair fits 51 x 23 cm
- Parachute nylon for lining, a pair fits 51 x 23 cm
- Short piece of 2 cm grossgrain ribbon
- Two ladderlocks for 2 cm webbing.
- Side panels – materials for pair (Photo)
- 2 x parachute nylon rectangle, 54 x 52 cm
- 2 x 40 cm of 2 cm wide webbing
- 2 x 7 cm piece of 2 cm grossgrain ribbon
- Two buckles for the webbing
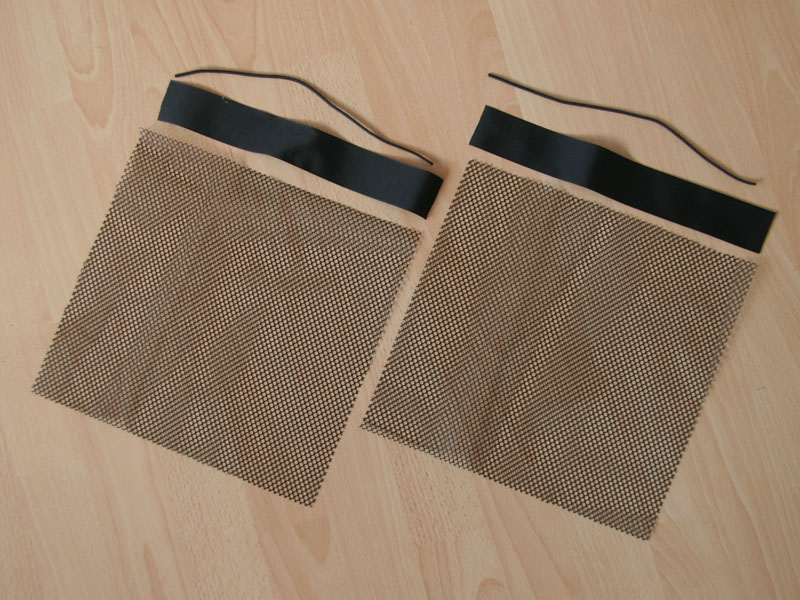
- Side pockets (Photo)
- 2x piece of durable mesh 26 by 27 cm
- 2x 3cm wide elastic or ribbon, 27 cm long
- 2x 30 cm of 3mm bungee cord if ribbon is used for the sleeve
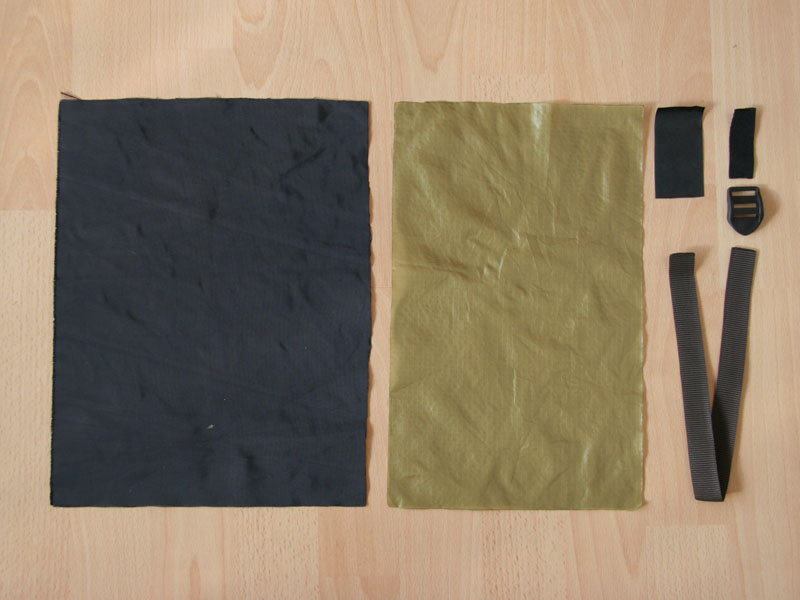
- Front panel and bottom (Photo)
- 32 x 20 cm of parachute nylon
- 32 x 24.5 cm of heavier uncoated fabrics for the pack bottom
- 7 x 5 cm patch made of the same fabrics as the bottom
- 6 cm of 2 cm grossgrain
- 40 cm of 2 cm wide webbing
- 2 cm ladder lock
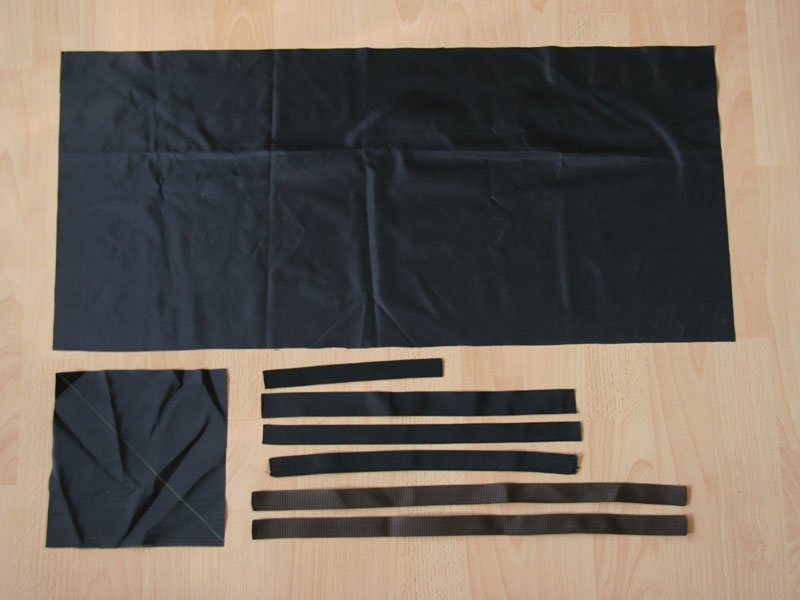
- Back panel (Photo)
- 32 x 71 cm rectangle of ligtweight coated nylon
- 32 cm of 2 cm grossgrain ribbon
- 32 cm of 3–4 cm wide grossgrain ribbon
- 18 cm of 2 cm grossgrain ribbon
- ~30 cm of 2 cm wide elastic
- 2 x 50 cm of 2 cm webbing (adjust to your height)
- 18 x 18 cm of heavier fabrics for strap reinforcements
Patterns
The patterns can be downloaded as PDF files in three different layouts. First is one large page with the whole pattern. The other two are divided to more pages of A4 or letter format for easy printing. The pages overlap a bit and there are alignment marks in the corners for precise assembly. Be sure to print the PDF in 100% scale, not automaticaly adjusted to page.
- Hipbelt and shoulder straps – One half of the (symmetric) hipbelt, one pattern for shoulder strap padding and one for it's shell including seam allowance. All, A4, Letter
- Side panel – edges color coded to distinguish seams with other parts of the pack. All, A4, Letter
Other parts are rectangular pieces of the fabrics, measured and cut according the list above.
Construction
The whole process is divided to several steps to make it easier to follow. Almost all parts of the pack are prepared separately up to the latest stage. These parts are then quickly assembled into the final product.
Hipbelt
Feel free to skip this part if you dont need a hipbelt. In my opinion, it's weight pays off because it removes much more weight from your shoulders, but it may not be necessary if you will carry only light loads. Another option is to use just plain webbing as a simple hipbelt to prevent the pack from bouncing on your back.
This hipbelt is very comfortable, because there is no narrow webbing that has to be padded. Instead, it is wide and a bit elastic so that it spreads the load evenly over large area.
Cut the hipbelt shape out of the thin foam acording to the pattern. It is possible to perforate the foam for some ventilation. However, the process is very tedious and is recommended only to those very patient. To make the connection to the pack stronger, the flap on hipbelt can be rinforced with a piece of ribbon glued to the foam (Photo)
Transfer the pattern to two layers of the shell fabrics and pin the layers together, adding the rectangle (about 4 cm) that connects the hipbelt to the pack (not in the pattern).
Sew exactly along the drawn line, leaving only the bottom side open.

Cut the shape out, leaving about 5 mm allowance and sear the edge.
Turn the shell inside out and insert the foam. It might be difficult to allign the seam allowance inside to get the perfect look. You can use this trick: turn the shell wrong side out and glue the foam aound it's perimeter to the shell (Photo). Use as little glue as possibe so that it doesn't soak through the fabrics. Turn it inside out – all the seam allowance will be on one side.
Sew along perimeter of the foam and quilt the shell to the foam to prevent it from sliding inside the shell (Photo).
Sew two short (∼ 5cm) pieces of elastic (sear the cuts) aligned with upper edge of the hipbelt. These will connect the hipbelt to the pack body and hold it in place while allowing free movement.
Finally, sew on the webbing with buckle.
Shoulder straps
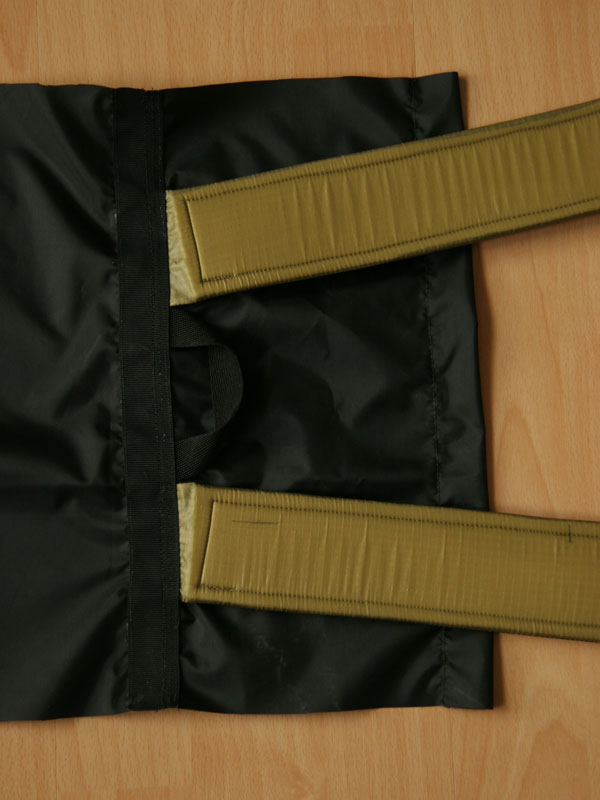
Shoulder straps of this pack are made of stronger fabrics, so that there is no webbing going all the way on top. This design distributes the load much more evenly and the straps could be padded with one layer of foam only. The pads are anatomicaly shaped for better fit, but you can save some weight using straight straps that can be made of lighter fabrics.
Cut the foam for padding, lining and shell fabrics. Remember to mirror the pattern if the fabrics has different sides. If an uncoated fabrics is used for the shell, the strap could be to weak downwards from the bend, because the fabrics is not cut along the fabrics grain. In this case, it could be reinforced by sewing piece of grossgrain ribbon in this region (Photo) or the strap can be made from two pieces, each cut along the grain.

Trace the foam piece on the fabrics and sew along these lines (about 2mm outside it), aligning the outer shell and lining wrong side out. Turn the shell inside out and insert the foam.

To stabilize the foam in the shell, you can either sew a line along the perimeter (shown in figure, Photo) of the strap or fix it by several short seams across the strap.
Sew on the ladderlock using short loop made of webbing or grossgrain ribbon. In my first prototype, I sewed the ladderlock to the shell only before second step, but I then found sewing through finished much easier and giving the same results. For stronger shell fabrics, I use two bar tacks, for lighter one, X-box stitch will be stronger. I prefer to sew the ladderlock a bit higher so that it partialy overlaps the edge of the strap, I find it more comfortable than using longer loop, when the buckle can chafe against your body.
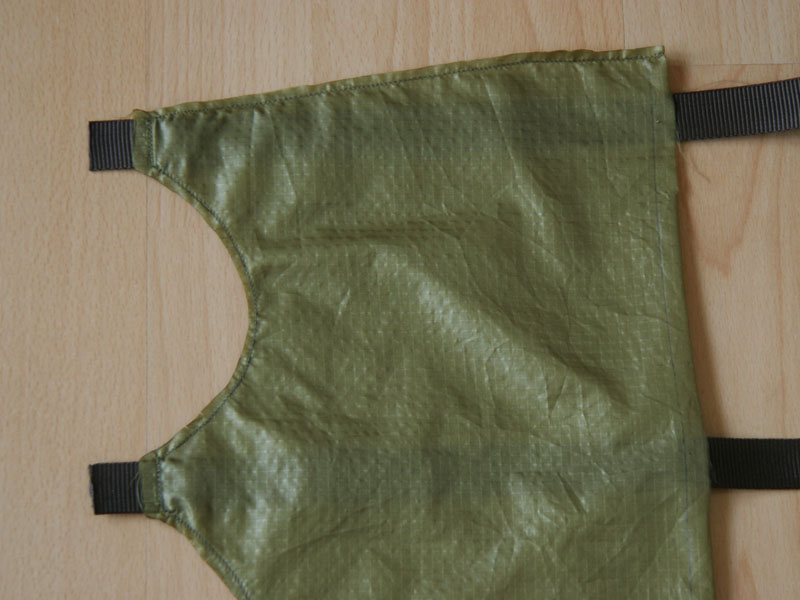
Side panels
Side panels are very important in this pack. They compress the drybag evenly, giving the pack much better shape than a harness made only of webbing. Side pockets are sewn onto it in next stage.
Side panels are made from two layers in similar way to the hipbelt, starting by sewing the layers wrong side out. Prepare two pieces of the material or use one folded in half and pin the layers together. Trace the pattern, leaving space for seam allowance.
Sew along the seam line only where it is marked in the picture.
Cut the excess fabrics, leaving 5 - 8 mm allowance. Sear the edges. In the inward-curved regions, you may have to cut the edge every ∼ 2 cm to release the tension when the panel is turned inside out.
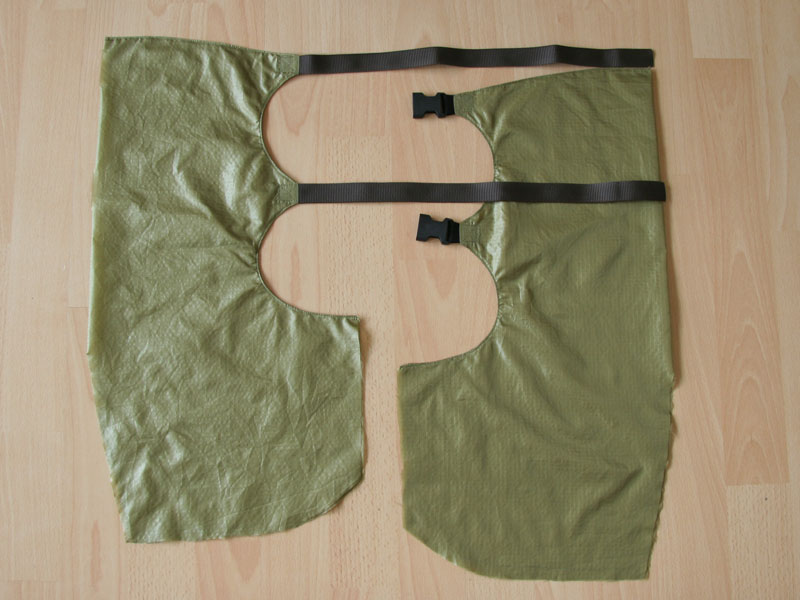
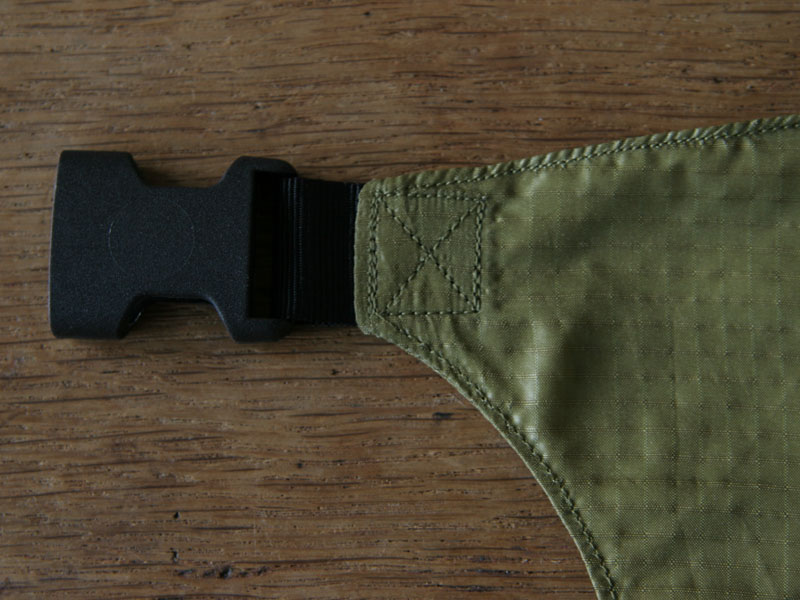
Insert the webbing (on right panel) and loops with buckles (left panel) between the two layers (Photo) and sew it in, leaving about 3 cm protruded outside.
Turn it inside out and sew a seam around the panel. Secure the webbing by sewing an X-box stitch (Photo, Detail).
Front panel
Front panel on this pack is very low, just to protect bottom of the drybag, that is most exposed to abrasion. It is held tight by the lowest compression strap, that runs through a sleeve on top of the panel. In one of my prototypes, I used a bungee cord with a cordlock in this sleeve, but I wasn't able to find a cordlock grippy enough to to really compress the bag.
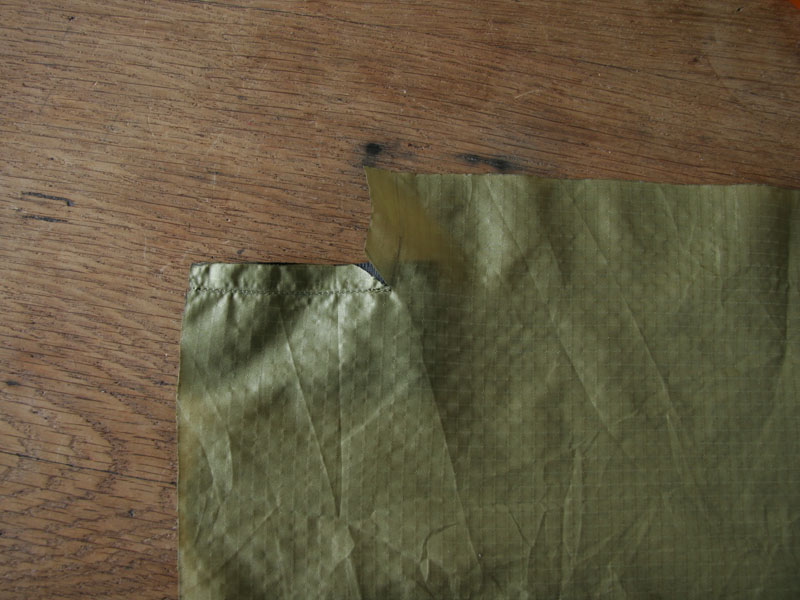
Prepare the panel and a reinforcing patch (5 x 7 cm) (I made it of the same fabrics as the bottom). Align the patch along the edge of the panel on it's wrong (inner) side. Sew it just to the cut in the panel. (Photo)

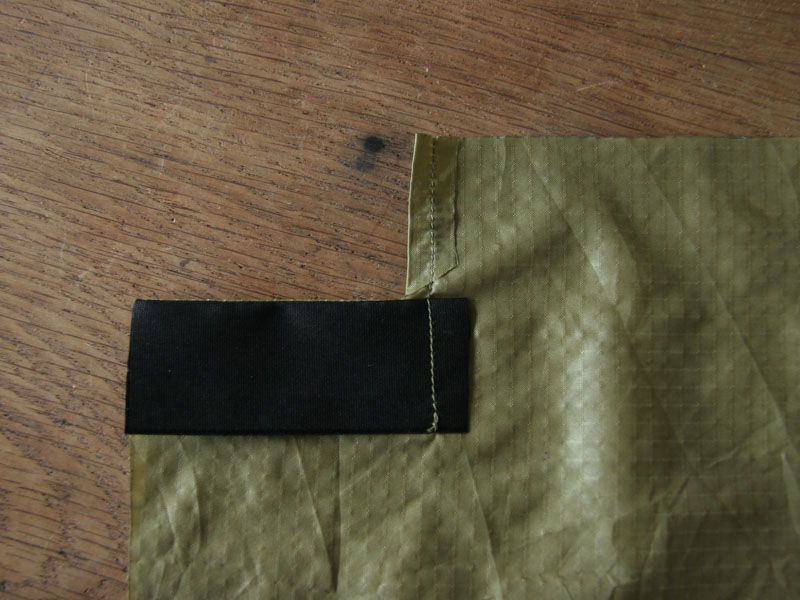
Flip the patch to front and hem it's bottom edge so that it is 3 cm high and has clean upper and lower edge. Fold the hem at the end of the sleeve and sew it, attaching right edge of the patch as well. (Photo)
Hem the upper edge of the panel.
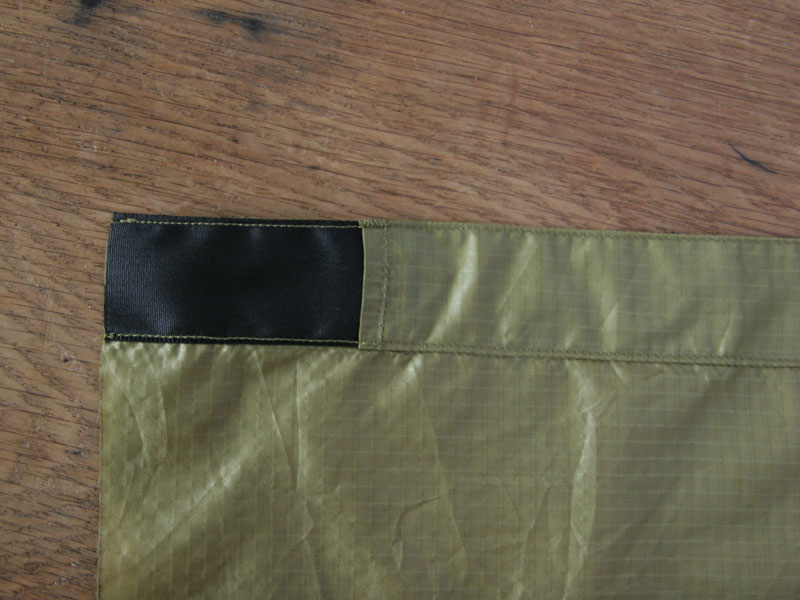
Fold the sleeve down and sew it. (Photo)
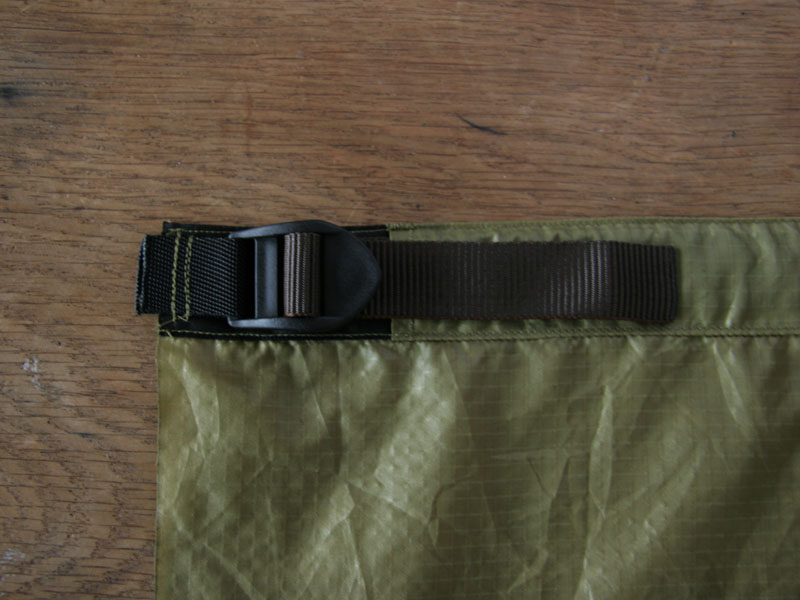
Insert webbing into the sleeve and sew it at the end, attach ladderlock buckle to the other end using short loop of webbing.
Sew the front panel to pack bottom. (Photo)
Side pockets
I use the mesh pockets on sides of the pack mainly for water bottles. For this reason, the pockets are made quite deep.
Prepare rectangular piece of mesh 27 cm wide and 26 cm high. It will made 25 cm high, 15 cm wide pocket. Sear it's edges so that it won't fray.
The upper edge is elastic and should be 17 cm wide when tot stretched. You can either edge it with stretched elastic or use a sewn-on sleeve with bungee cord or elastic inside as shown in pictures. The sleeve can be made from a strip of fabrics or a ribbon. Bungee cord is sewn in at one side, then pulled out to get desired width and sewn on the other end.
On the bottom side, make 5 cm wide flat fold that will make the pocket 17 cm wide (picture) and secure it by pins.
Sew the fold in seam allowance to secure it permanently. (Photo)
Sew he pocket to the panel 16 cm from it's left edge. The fold should face down, so that it will be on the outer side when the pocket is flipped back.
Turn the pocket back to it's place and sew along the seam from previous steps. Sew the unfinished edges of the pocket to the edge of the panel in seam allowance. This seam will be hidden when the pack is completed. Finally, cut the corner out along edge of the side panel.
Backpanel
In this section, the backpanel is prepared and connected to other parts of the pack.
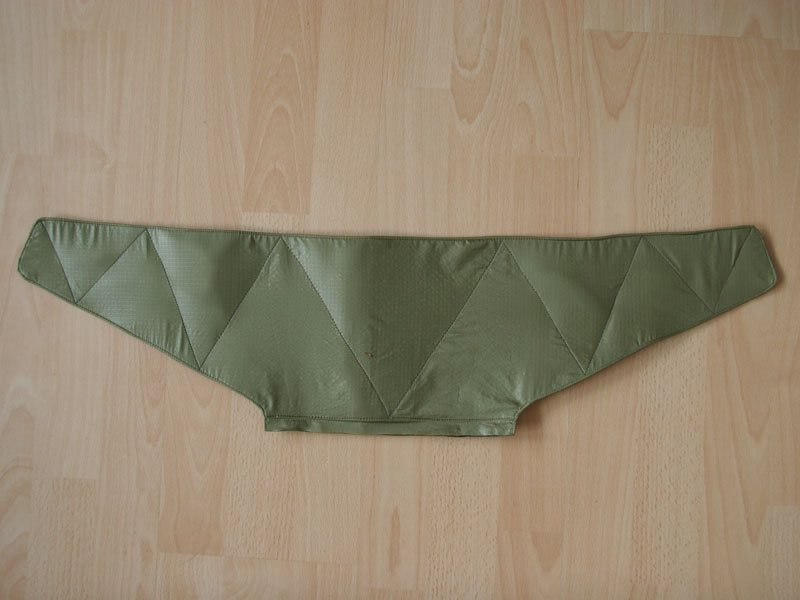
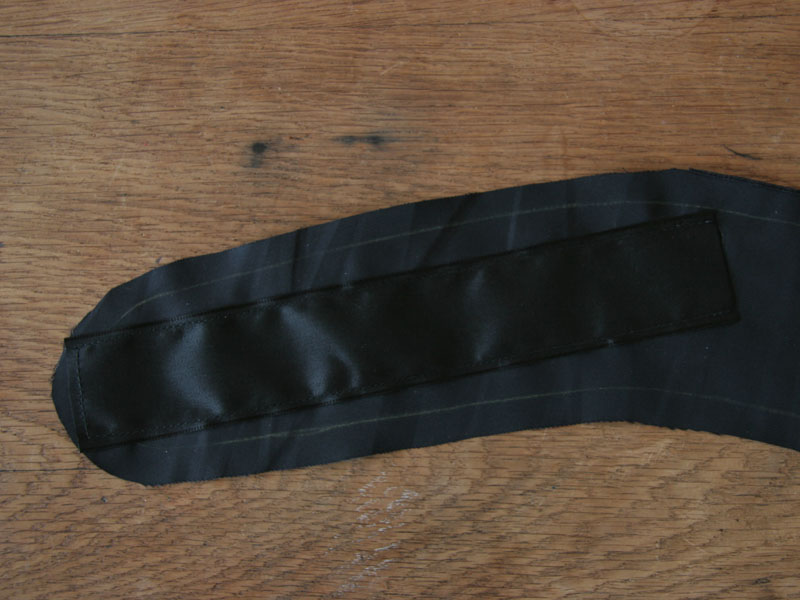
First of all, we'll make reinforcement of shoulder straps webbing. 18 x 18 cm square of heavier fabrics is cut into two triangles, and their long edges are folded.
The triangles are then sewn onto the webbing, using box stitch or few bar tacks, and the complete setup is then trimmed to form sharper angle, at which the webbing is connected to the pack body.
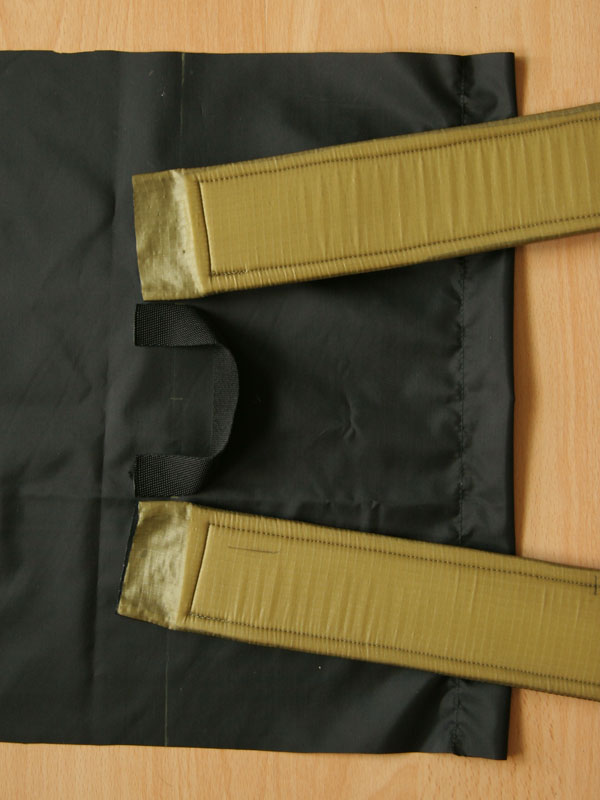
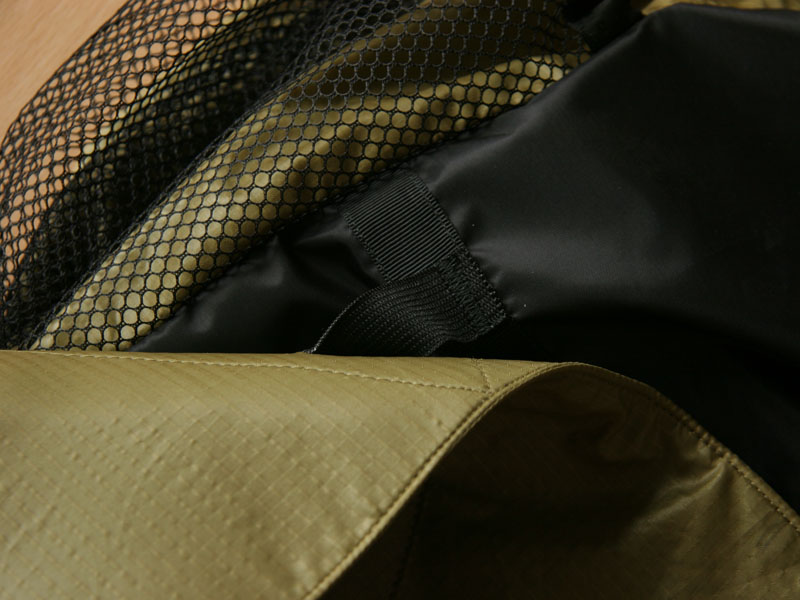
The backpanel is basically a large rectangle of coated nylon. Including 1 cm seam allowances, it measures 71 x 32 cm. Some important distances on it are measured in the picture. To begin with, the upper end is finished with 3 cm hem that makes sleeve (coating is inside) for an elastic that is added later.

Now, we'll work on the uncoated (outer) side of the bacpanel. A reinforcement ribbon is sewn to the lower part of the backpanel to provide stronger connection to the hipbelt. If the hipbelt is not used, this reinforcement should not be used as well.
Shoulder straps are placed onto the backpanel as indicated in the picture, with the handle loop in between them (Photo). Their ends are then covered with 3-4 cm wide grosgrain ribbon, that reinforces their connection to the fabrics. When everything is pinned in place, sew the edges of the ribbon to the panel and then add few more lines of stitches in between for strength. (Photo)
Shoulder strap webbing is now attached to the corners of the panel.
Finally, the side panels are aligned with the backpanel (the outer side with pocket facing down) and sewn. Make the seam strong by sewing it twice, with some extra stitches where the webbing is connected.
Final assembly
Almost there...
The hipbelt is sewn to the edge of the backpanel, the extra fabrics can be trimmed.
The upper end of the hipbelt is connected to the backpanel with the two pieces of elastic. The elastic is sewn to the reinforcement ribbon on the panel (Photo).
Now, the front panel and bottom of the pack are sewn to the side panels. Finally, the seam connecting pack bottom to the backpanel (with the hipbelt sewn in between) is finished. This seam should be sewn multiple times, because it takes all the load from the hipbelt.
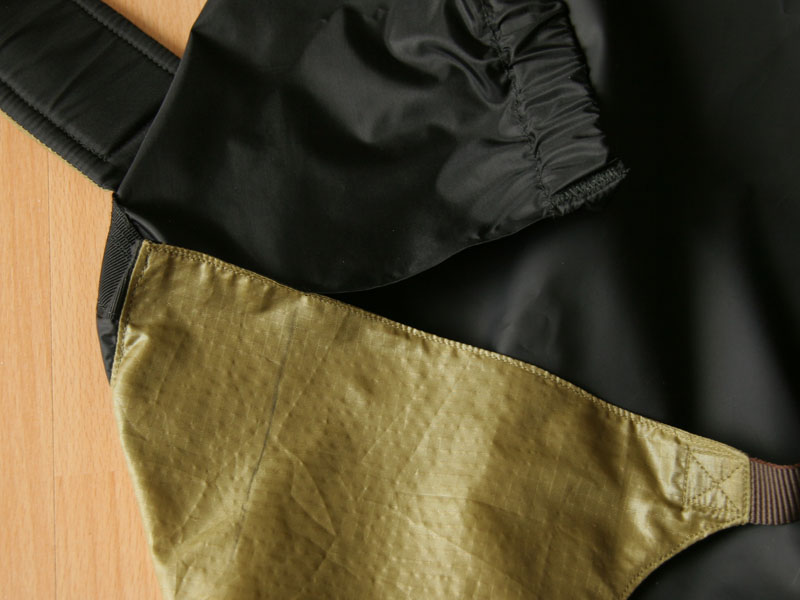
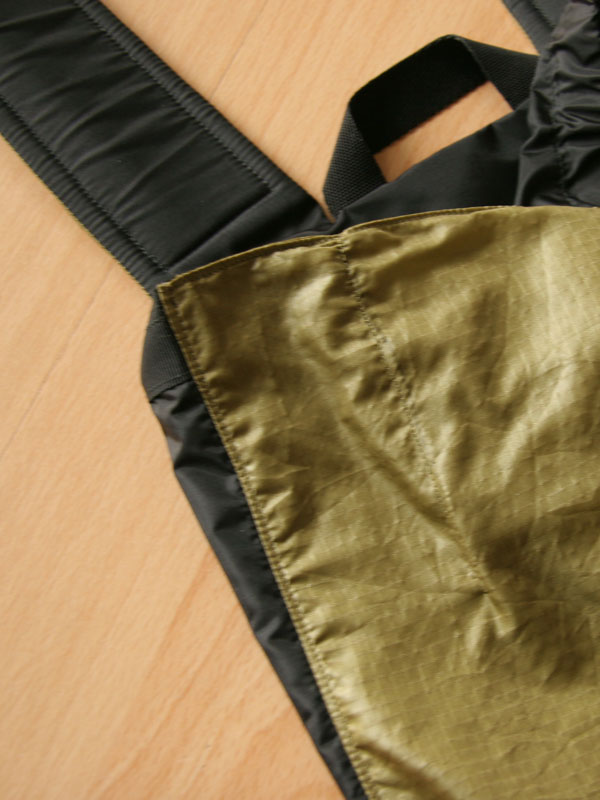
To finish the pack, we have to create the pocket for sleeping pad on the top. Elastic (30 cm on less, depending on its strength) is inserted into the sleeve in the upper edge of the backpanel and the ends are sewn through. The pocket is then created by sewing the free end of backpanel to the sides of the pack (see picture, Photo 1, Photo 2). The distance from pack's back can be adjusted to the thickness of your folded pad, mine is 5 cm and fits most types of ful-length pads.
Drybag
If you want to make your own drybag for the pack, here are the basic instructions. Simple 2D bag fits the pack better than 3D one with sewn-in bottom. To get the right shape, bottom corners are rounded as shown in the picture. Dimensions of the finished drybag are 45 x 85 cm. the closure is reinforced by strip of thin plastic sheet (or webbing), so that the rolled edge holds the shape when closed. Seal the seams to make the drybag dry.
Further improvements
Custom folding pad
It is possible to use normal sleeping pad, rolled and pressed flat, as the frame. There are two disadvantages: It is difficult to make the roll the right diameter to match the width of the pack accurately, and the pad compressed in this shape tends to curl when unrolled. To solve these issues, I made folding pad for use with this pack. Full length pad, 180 cm long, perfectly matches the pack width when folded in 30 cm sections. To make an accordion fold, I measured 30 cm sections and cut along these lines to about half the thickness of the pad, alternating the sides. The fold lines are then reinforced by a strip of textile tape on the side opposite to the cut. I used a plaster with very strong glue, and it is in perfect shape after two or three years. Another types of tape can be also used, check what tape sticks best to your pad.
Hard frame
When using this pack with thin, short or inflatable pad, the back of the backpack can get curved more than it's comfortable. If you don't like to have round pack, you can insert some rigid sheet between the pad and the drybag. I use a piece of corrugated plastic, that is often used to make signs. Sharp edges of the sheet should be wrapped by tape, rounding the corners first. I have the hollows in the sheet running horizontally, because the pack is strong enough vertically, and I want to prevent the back from getting round. It also allows to make a bend in the lumbar area to follow the shape of the pack.
Bottom pad pocket
For better control of the pad frame, it is possible to add a pocket for the lower end of the pad at the bottom of the pack. My first versions of the pack used this pocket, but I later found that it is not necessary. In the last version presented here, the pad is held in place just by the pressure od the loaded and compressed bag, what works fine so far.

Creative Commons Attribution-Noncommercial-Share Alike 3.0 Unported License.